image::/images/2012/04/javafx_logo_color_1-300x150.jpg
As you may have guessed from my recent book review, I’ve been tinkering with JavaFX some, as time as permitted. I’ve been following the technology fairly closely since Sun announced the project way back in 2008. When it was announced that JavaFX 2.0 was finally available, albeit in preview form, for the Mac, I was ecstatic. I ran into issues, though, trying to get it to run in my IDE, though. After some guess work and googling, I finally figured it out. In retrospect, it may be obvious, but if you’re like me and are missing the obvious, I’m going to detail the steps I took to get it running on my Mac. Perhaps it can help someone out.more
The first step, of course, is to download the binaries. You can do that here, sort of. Since this is still a preview release at the time of this writing, you have click the teeny tiny link under the header. Once you’ve downloaded the distribution, you need to extract it somewhere:
1
| $ unzip javafx_sdk-2_1_0-beta-b19-macosx-universal-27_mar_2012.zip -d $HOME/local/
|
You can, of course, put it anywhere you want, but you’ll need to adjust the following instructions. The next step is set up NetBeans. NetBeans has JavaFX support out of the box, assuming your JDK has JavaFX support. Since the Mac JDK does not yet, we need fix that. Otherwise, you’ll see this error:
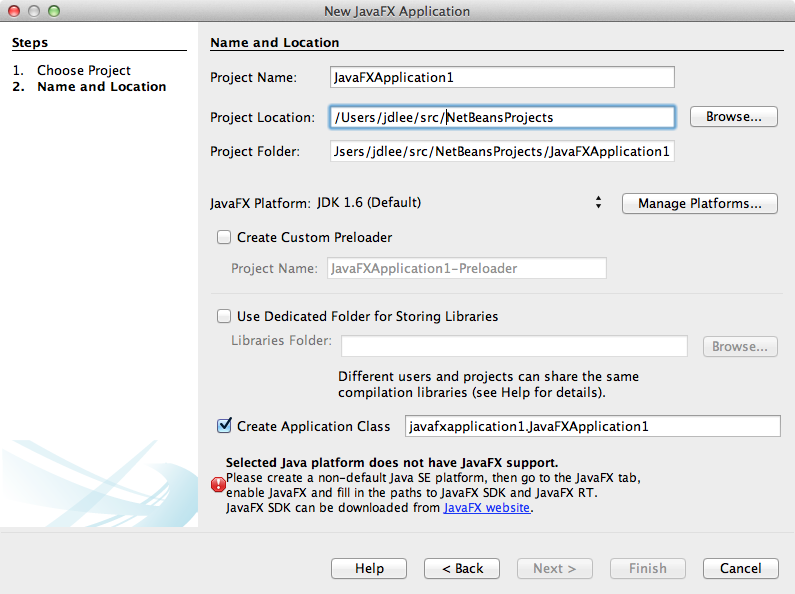
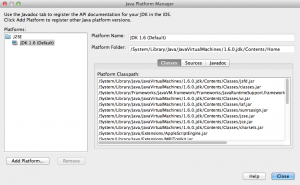
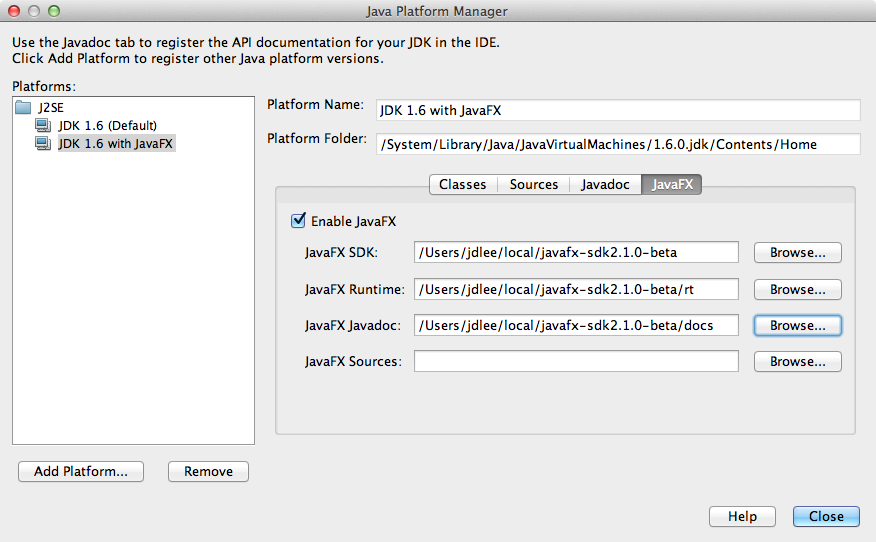
To fix this, we need to create a Java Platform with JavaFX support (I don’t know why we can’t modify the default platform, but we can’t, so we get to create a new one, which we can set to be the default if we want). To do that, go to Tools > Java Platforms, where you should see something like this:
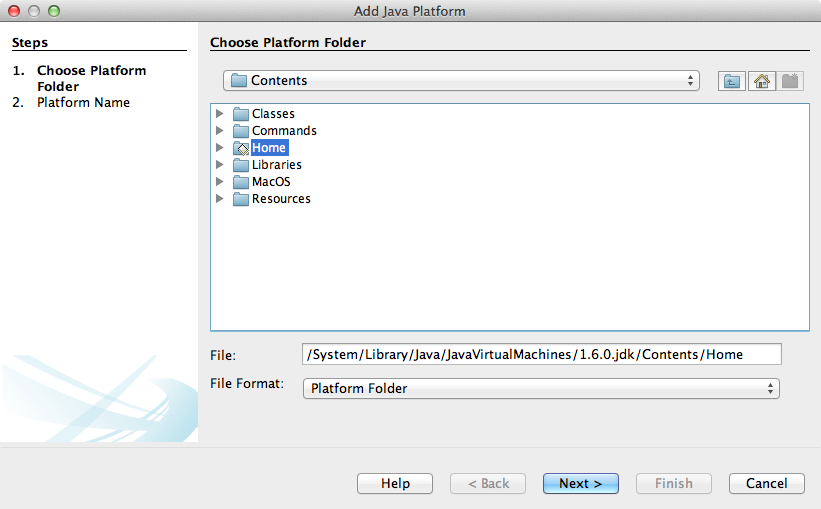
To create a new Java Platform, click the (wait for it…!) "Add Platform…" button in the lower left corner. OS X likes to put things in decidedly (to me) un-Unixy locations, and the JDK is no different. You can find the current JDK under /System/Library/Java/JavaVirtualMachines/1.6.0.jdk/Contents:
We now need to give it a name, so we’ll call this "JDK 1.6 with JavaFX" and click OK. But wait, there’s no JavaFX support! To enable JavaFX support, we have to…um..enable it. Doing so looks like this:
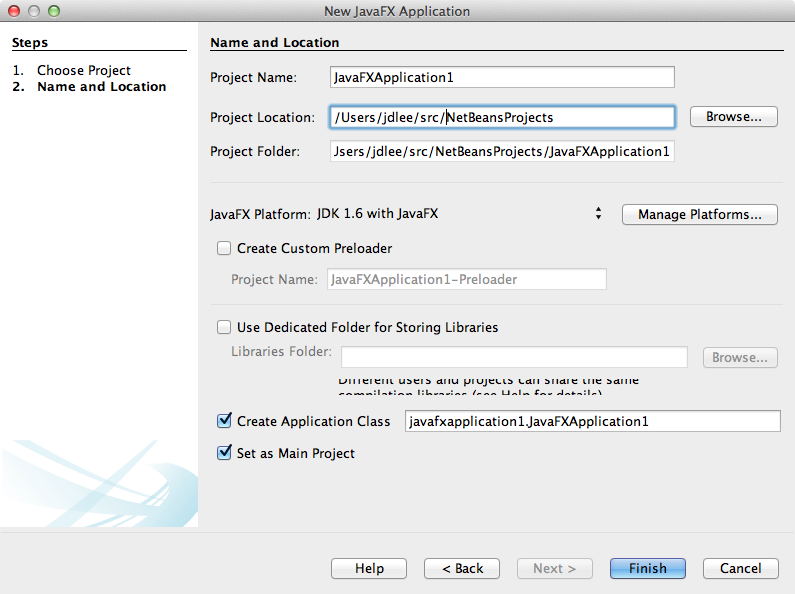
We can now create a new JavaFX project:
Your new project is ready to run.
The even more adventurous may be wondering how one would do this with Java 7, to which I say, "Good question!" : ) I have mixed luck getting NetBeans and Java 7 to play nice on my Mac. It’s almost certainly pilot error, as I’ve done it before, as has Adam Bien, but I haven’t had a chance to debug things (e.g., the navigation tree under projects has all the tree icons, but no text. IIRC, the context menus are also text-less. Strange).
At any rate, as I noted earlier, in retrospect, this seems pretty easy (if a bit unintuitive) and might be documented somewhere, but I couldn’t find it. Either way, it’s certainly documented now. I hope it helps. : )
image::http://www.apress.com/media/catalog/product/cache/9/image/9df78eab33525d08d6e5fb8d27136e95/A/9/A9781430268727-3d_11.png
I recently blogged about a change we made in GlassFish 3.1.2 with regard to REST security. Specifically, we added some CSRF protection (you can read the details here). For those of you using the Jersey Client, updating your code to support this change is very simple:
1
2
3
4
5
| import com.sun.jersey.api.client.filter.CsrfProtectionFilter;
// ...
Client client = new Client();
client.addFilter(new CsrfProtectionFilter());
// ...
|
On the client side, that’s all you have to change. Jersey will take care of the details.
As you may know by now, we released GlassFish 3.1.2 yesterday. Tim Quinn has a nice overview of some of the security-related changes, but one change he didn’t cover was one in the RESTful administration area, namely CSRF protection. I won’t go into the details of what CSRF attack is here, but I do want to show we’ve added protections to GlassFish to make sure the server is as secure as possible.
For the curious, we implemented the CSRF protection using a filter provided by the Jersey team. As you can see from the javadoc, this change only affects requests that change state (POST, PUT, DELETE, etc).
To update your client code, all you need to do is add the X-Requested-By header. Its value doesn’t matter:
1
2
| curl -X POST -H 'X-Requested-By: YeaGlassFish' -d key=value \
http://localhost:4848/management/domain/path/to/resource
|
That’s all there is to it. It’s a very simple change, but an important one. If you run into any issues with this, please let us know!
Recently, Matt Raible again presented his Comparing JVM Web Frameworks, this time at JFokus 2012. The intent of the presentation, as best as I can gather from half a world away, is to prevent some of the major JVM-based web frameworks, showing the various strengths and weaknesses, which will allow the audience to choose a framework more easily. While the goal is laudable, I’m just not sure how well executed the attempt was.
I had the opportunity today to present an introduction to CDI at the Oklahoma City Java Users Group. It was a smaller crowd, but they had great questions nonetheless. After a rough start in a workspace that wasn’t quite as clean as it should have been, I think the went fairly well. I had a good time at least. : )
Thanks to all those that came out and asked questions during and after. If you’d like to play with the code (WARNING: for those of that weren’t there, these examples are 100% creativity free :), you can download the project here.
JAX-RS is the specification that describes how to build RESTful interfaces in a Java EE environment. Jersey is the reference implementation of that spec, and, like many implementations, offers features above and beyond what spec does. One feature that I’ve been working with recently is the POJOMapping feature, which makes writing services and clients much easier, as well as typesafe.
For the GlassFish Administration Console, we have quite a few tests (about 133 at last count). Given the nature and architecture of the application, we’ve chosen Selenium to drive our tests. One of the problems we’ve faced, though, is understanding why a test failed due to the length of time the tests take (roughly 1.5 hours to run the whole suite). Sometimes, we can look at the log and know exactly what failed, but not the why. Did the screen render correctly? Did, perhaps, the click, etc. not get performed (we’ve seen instances of that) leaving the application in a state not expected by the test? Since I usually start the tests and move on to something else, we had no way of knowing. Until now. I finally sat down and figured out how to grab a screen shot when a test fails. I’ve distilled that technique down to its essentials, which I’ll share here.
I hope everyone who happens to find this site this Christmas season has a very special and blessed time with friends and family. On this geek blog, I think it appropriate to leave you all with a retelling of the Christmas story…through Facebook. God bless!
For a few months now, I’ve been working on a small application called Cub Tracker which is designed to help Cub Scout den and pack leaders track the progress of the scouts assigned them. I’m a big fan of testing, so I’ve done my best to follow TDD as I’ve worked on the app. Early on, it became clear that I needed a better way to test, as the official Android app is slow and unreliable at times. Via Twitter, I was turned on to Android-x86 and after a couple nights of hacking, I think I have a usable installation of Android-x86 under VirtualBox that has sped up my testing considerably. In this article, I’ll show you how I did it.

 My name is Jason Lee. I am a software developer living in the middle of Oklahoma. I’ve been a professional developer since 1997,
using a variety of languages, including Java, Javascript, PHP, Python, Delphi, and even a bit of C#. I currently work for Red Hat
on the WildFly/EAP team, where, among other things, I maintain integrations for some MicroProfile specs, OpenTelemetry, Micrometer,
Jakarta Faces, and Bean Validation. (Full resume
My name is Jason Lee. I am a software developer living in the middle of Oklahoma. I’ve been a professional developer since 1997,
using a variety of languages, including Java, Javascript, PHP, Python, Delphi, and even a bit of C#. I currently work for Red Hat
on the WildFly/EAP team, where, among other things, I maintain integrations for some MicroProfile specs, OpenTelemetry, Micrometer,
Jakarta Faces, and Bean Validation. (Full resume